 |
|

  |

 Nov 7 2012, 12:04 AM Nov 7 2012, 12:04 AM
|
|
 GT for life! Group: VIP Members Posts: 6,303 Posts Per Day: 0.89 Thanks Received: 478 Trader Stats: 2 (100%) Joined: 27-January 05 From: Greenville, SC Member No.: 34 Mood: Optimistic |
So this past weekend I installed a stereo in my 2013 GT. I took some pictures along the way and will put together a guide for anyone else that wants to undertake a similar project.
First disconnect the battery. If you don't know how to do that, then stop here and drive your car to the nearest stereo shop and have them install it for you.  Second, remove the silver trim from around either side of the headunit. Start by taking a small flathead screw driver to pull the bottom edge of the trim away (see pic below). Slide your fingers under the trim starting at the edge by the gear shift. Grab the trim firmly and pull up and out to pop the clips out. It takes a fair amount of force to wiggle each one out. Just take your time and you will be fine. Work your way up the silver trim until you have it completely removed. Once removed put the trim someplace safe where it won't get scratched. 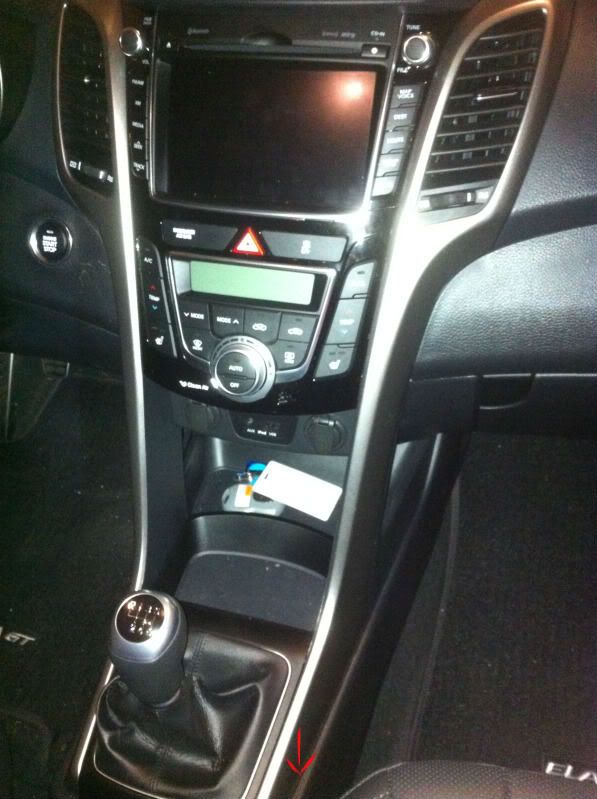 Once you have both sides of the trim removed, next is to remove the headunit and HVAC panel. There are 4 screws on each side (2 for the radio and 2 for the HVAC). See the red circles in the pic below. Take out all 8 screws and then the headunit and HVAC panel will slide out. Keep these screws organized as they are different sizes for the radio and HVAC panel.  After the screws are out, the radio and HVAC panel will slide out together. Gently wiggle the radio free of the HVAC unit and let the HVAC panel hang down while you disconnect the wires in the back of the radio. For the navigation unit there were I believe 5 different wires that had to be disconnected from the back of the radio. Once they are all disconnected set your radio aside safely so it doesn't get scratched or damaged. Pics below show removal of radio and how it separates from the HVAC panel. 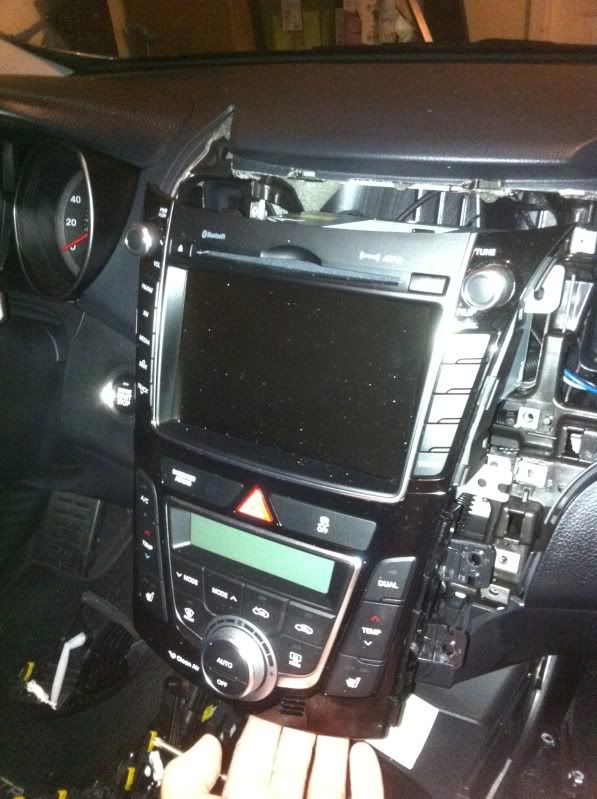  Now it is time to install the line out convertor. I picked one up from the stereo shop where I got the speakers, but they all basically work the same. They tap into your speaker wires to turn the speaker signal into an RCA output which is needed to plug into the amp. I decided to tap into the rear speakers so in case I don't want the sub on, I can just fade it to the front speakers. You could do either front or rear speakers. The following is assuming a basic understanding of electronics, but you will need to first strip the foam cover back that goes over the wires to give yourself enough room to work. After that, use the following diagram to identify the wires you want to tap into. Note there are two plugs. You want Connector A. When you are determining which wires to tap into, make sure you look at the shape of the plug in the diagram to ensure you are holding the plug the same way and getting the right wires. It wasn't too hard, but if you had the plug backwards or upside down, things could get messed up. You can solder the wires together, twist together and use electrical tape, or use various wire connectors. In any case you need to connect the + and - wires on the line output convertor to the right and left + and - wires in the harness. After splicing together the four wires you can plug your RCA cables into the convertor. There is plenty of room behind the headunit to tuck the convertor back there. Personally I put it on the right side of the radio and can access it with just the trim removed from the large vent opening. This is nice if I ever want to adjust the level to the RCA's, which right now i have turned down to about half way. (sorry didn't snap pics of the convertor) 2013 GT Wiring Diagram 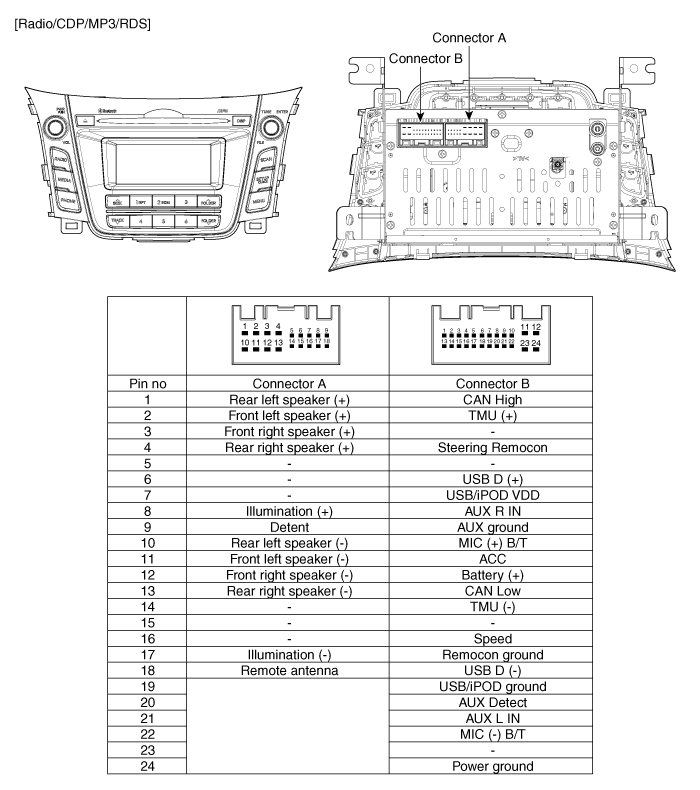 Ok, now its time to run the RCA's back to the amp in the hatch. I removed the side trim that covers the side of the center console. In order to remove this you need to remove one screw (see red circle) and then the trim just slides out. I can't recall if I actually needed to remove this piece to get access behind the glove compartment or not. I just know I had it off. 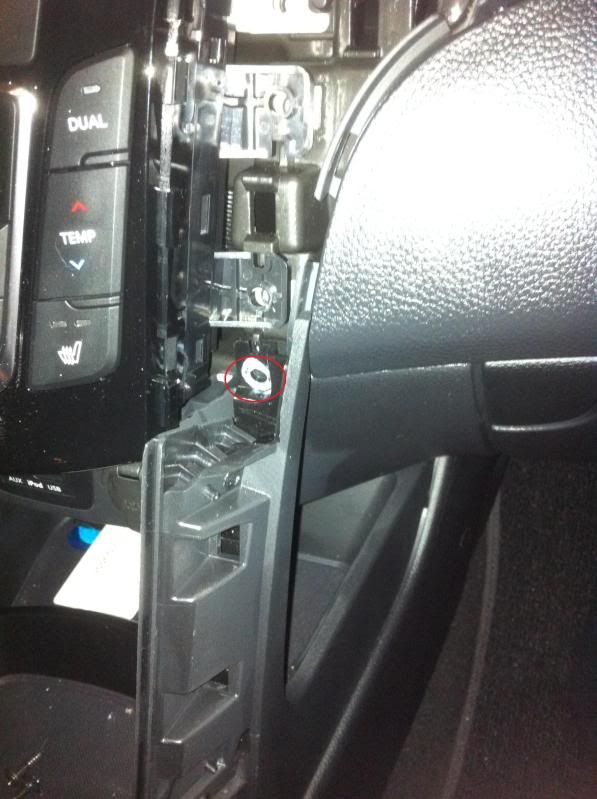 Now its time to disconnect the glove compartment so you can get access behind it. Once you disconnect it, it just hangs straight down and you have plenty of room to work. On the right side you simply pop off the loop from the little clip sticking out the side of the glove compartment (1st pic). After this is done, there are two plastic circles (one on each side) that you simply twist and wiggle out (third pic). Once you have both of these out, the glove comparment will just hang down and give you full access behind it. 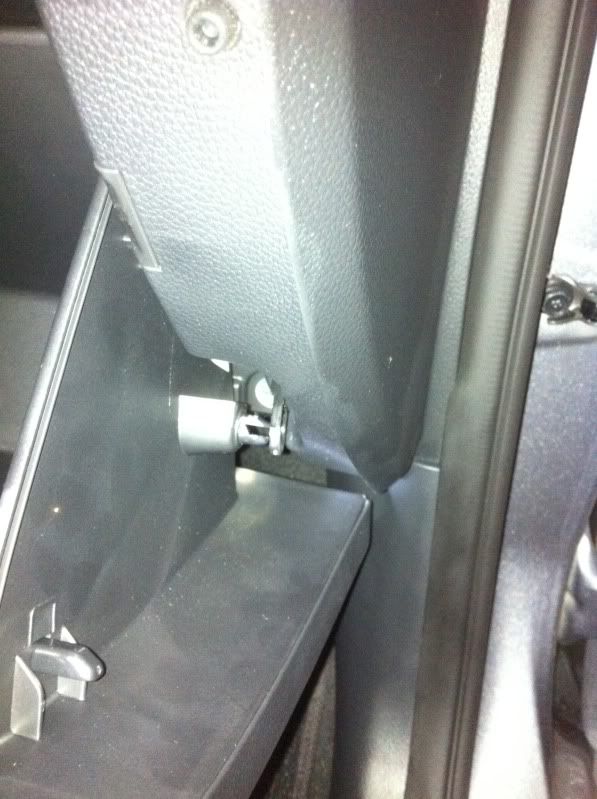 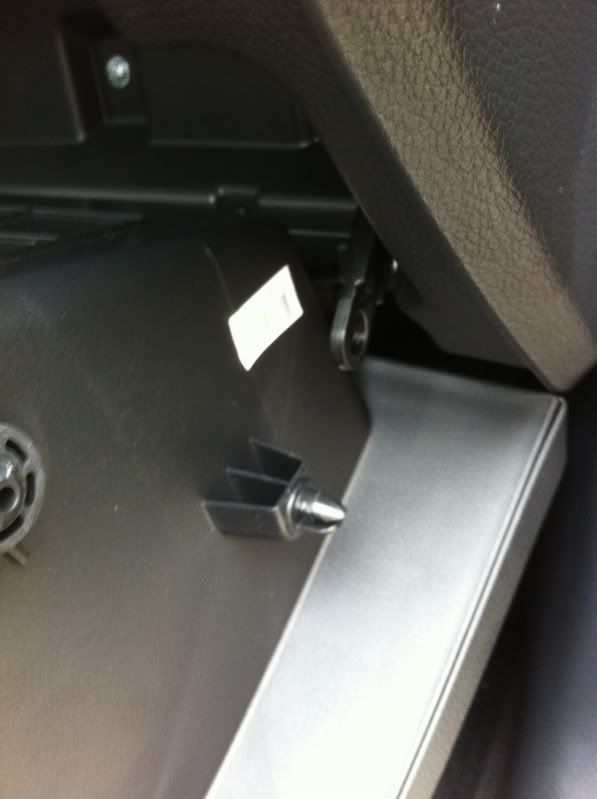 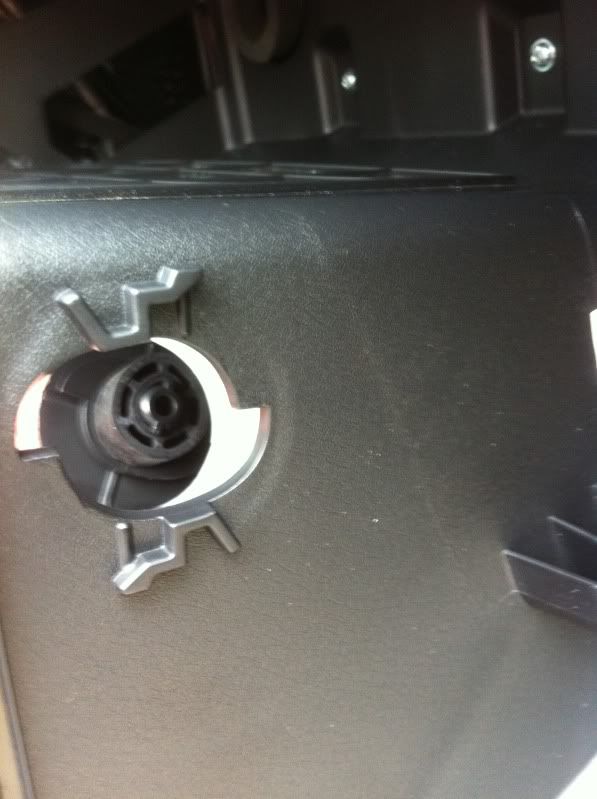 You can now feed the RCA's behind the glove compartment to the right side of the car. To run the cables, I popped off the plastic trim on the front passenger door off (1st pic). I also popped off the trim by the rear passenger door. Note for the rear trim, you need to pop the back seat and fold it down to remove the screws (2nd pic). There are no screws for the front trim. Be careful with the rear trim. It is a large piece of plastc and I actually cracked the driver side in one spot by being in too much of a rush. I was able to run the cables to the back by just removing these two pieces and just pushing them up from the bottom of the trim on the pillar in between the front and back door. I didn't even look into trying to remove that as there wasn't any issue pushing the wires up from the bottom. At this point the RCA's and now back under the rear seat. I folded the back of the rear seat down a little to push the cables back to the hatch area. I left any extra wires under the rear seat. 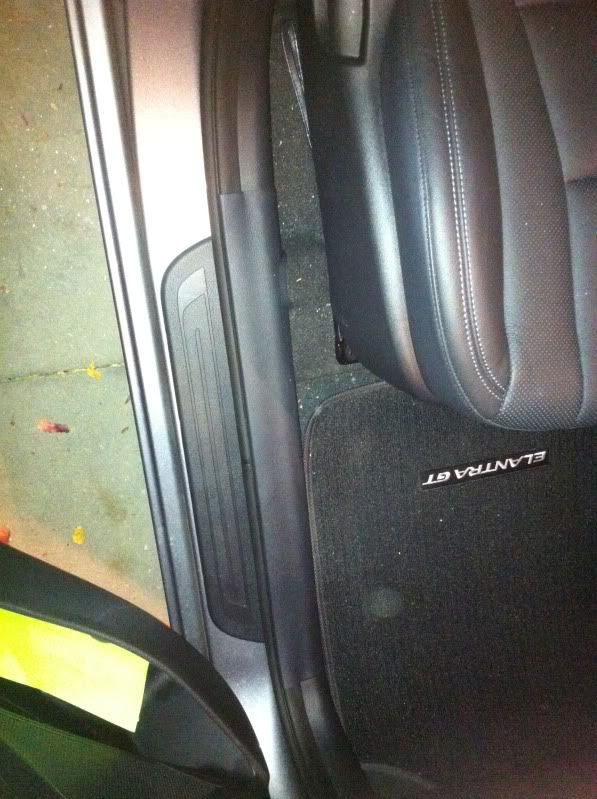 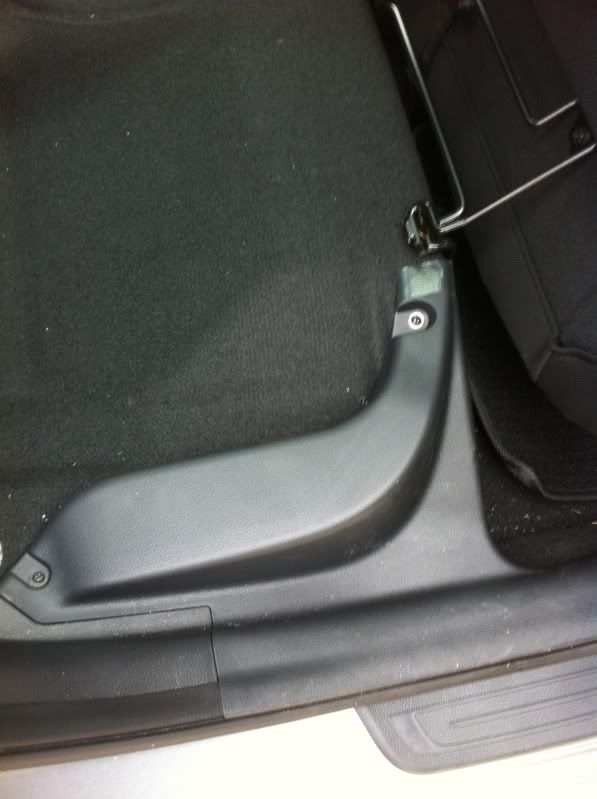 Now its time to run the power to the amp from the battery. There are a couple different ways to get the wire from the engine bay into the car. I decided to fish the wire through the front side fender, down next to the door, and in through an extra rubber grommet that was on the door. In order to get the wire into the car I pulled the grommet out and put a hole in the center to feed the power cable through. After this, I had to remove the panel behind the hood release. There was one screw on the hood release that needed to be removed and then the plastic panel came right off. (1st pic below). Behind this plastic panel was a rubber covering that was directly in line with the rubber grommet that i removed. I poked a hole in the cover and fed a wire hanger through this hole and out the hole where the rubber grommet was. I wrapped the wire hanger around the power cable and pulled it into the car. After pulling it snug, I put the rubber grommet back in place. I then fed the power cable through the car the same way I ran the RCA cables, just on the driver side instead of the passenger side. 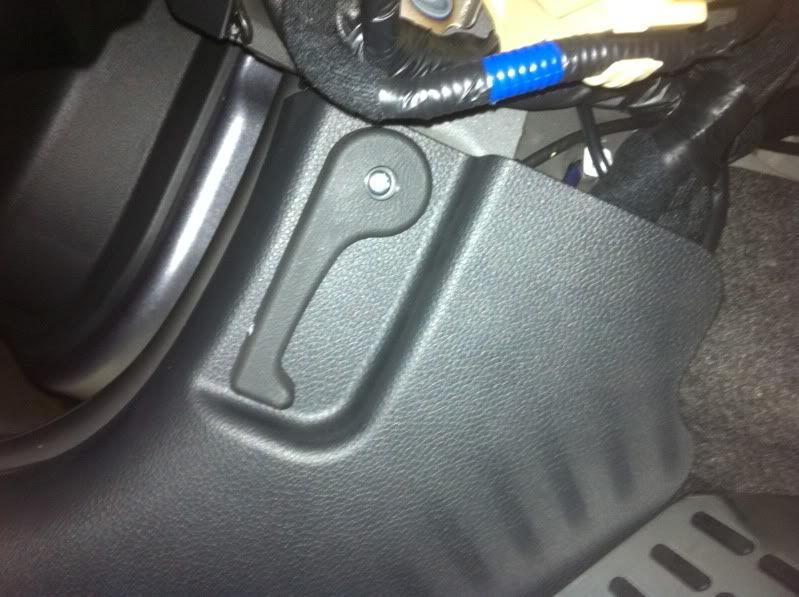 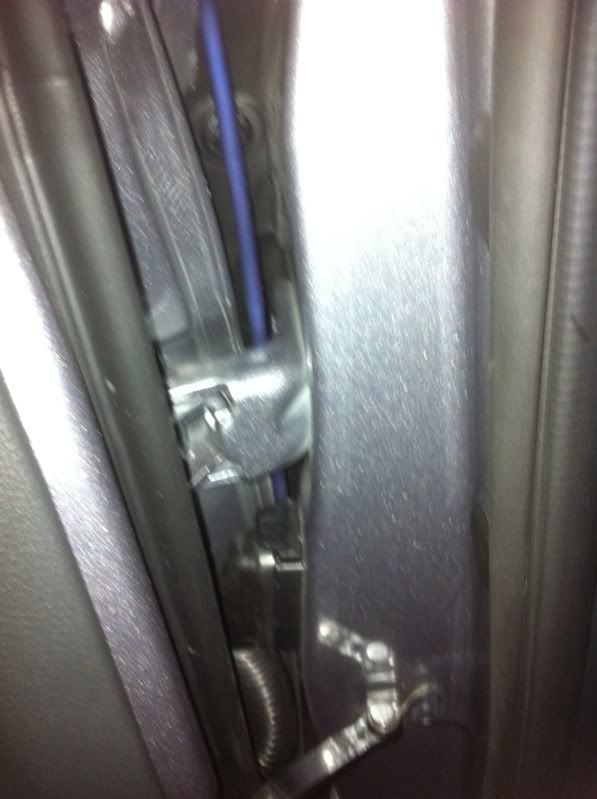 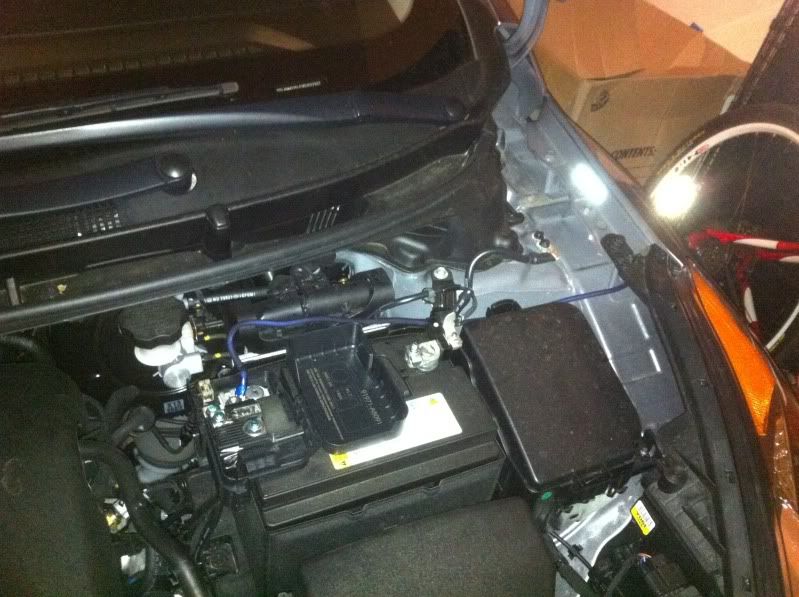 For the amp remote turn on, I grabbed power from the auxiliary plug in the trunk area. To get to the plug there were two bolts to be removed (1st pic) and then the trim popped right off. To get to the bolts, just take a small flathead screwdriver to remove the plastic cover over the bolt. The wires going into the plug were black (ground) and orange (12v) so I spliced into the orange wire. I then replaced the trim and attached the amp ground wire behind the plastic trim to one of the bolts I was putting back in. So now we have the RCA's, power cable, remote turn on and ground all attached and in the hatch area. 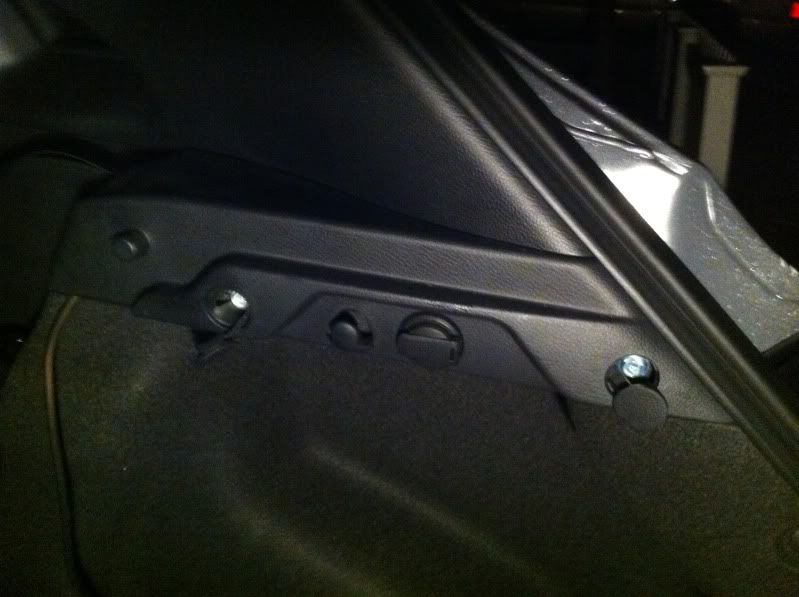 Now its time to hook up all the wires to the amp, run speaker wires to connect the amp to the sub, reattach the battery and test everything out. After you have made sure that everything works and are happy with the settings, put the car back together, and sit back and enjoy the tunes  Here are some install pics. The first pic is with the amp just sitting in the trunk. The second pic is showing the under storage compartment that is a perfect fit for the amp and the third is what it looks like with the amp "hidden" in the storage compartment. Note, I didn't get all the wires hidden yet as I am testing out whether the amp will overheat in this enclosed area. If it does, then I will figure out another place to put the amp, or get a computer fan as was recommended to keep the amp cool. In any case, I hope this helps some of you! 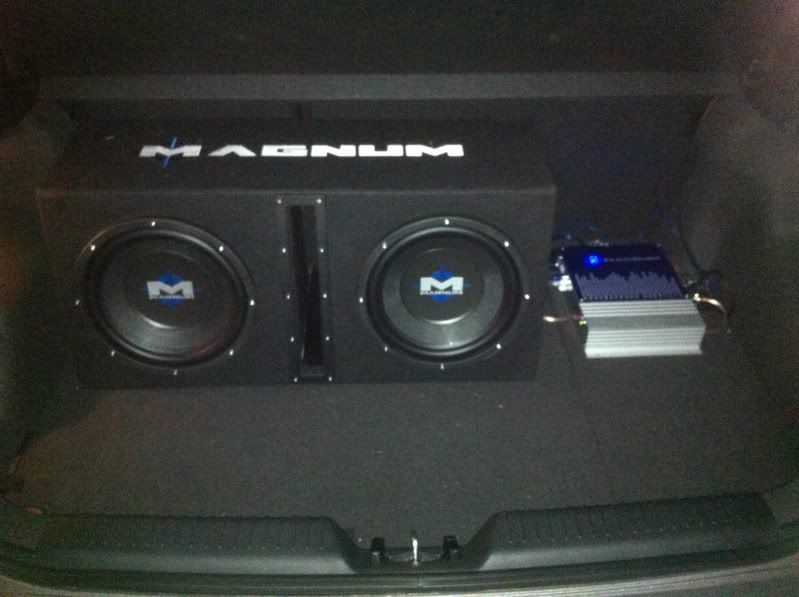 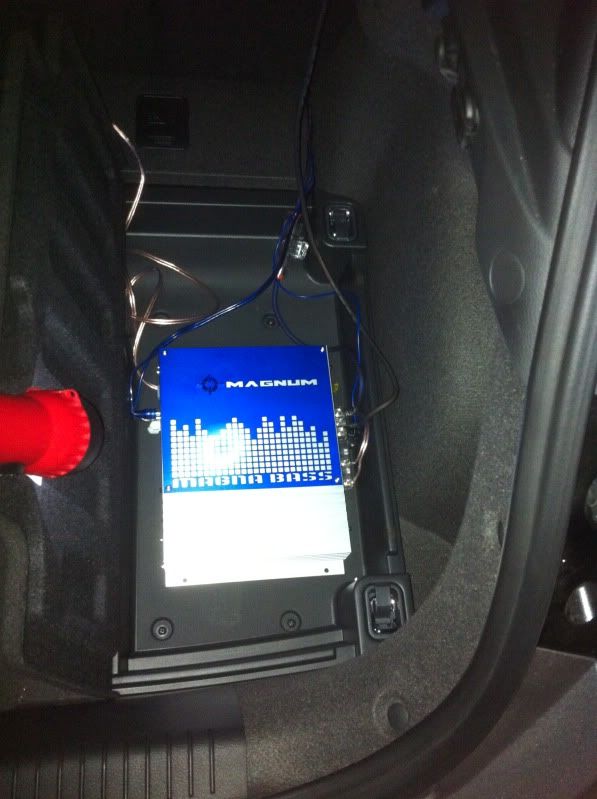 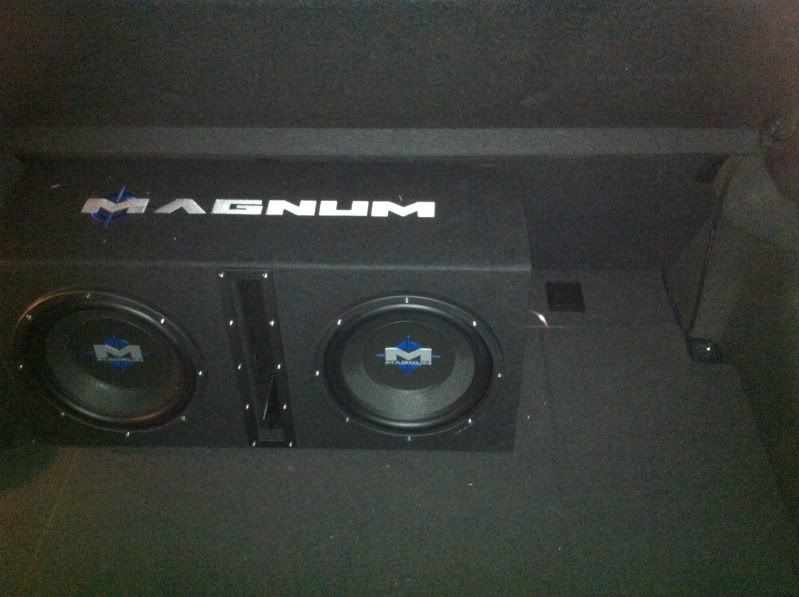 -------------------- Please consider helping keep the club online and independent. Donate here to help the club.
 Current Car: 2013 Hyundai Elantra GT, 6 spd manual w/ the style and tech packages Previous Hyundai's: 2011 Hyundai Sonata SE in Venetian Red; 2006 Hyundai Sonata GLS, 3.3L V-6 in Ebony Black; 2004 Elantra GT, 5 spd manual in tidal wave blue |
 |
 
|


|
Nov 7 2012, 12:30 AM
|
|
 That Guy.. Group: Leader Posts: 6,687 Posts Per Day: 1.17 Thanks Received: 724 Trader Stats: 16 (100%) Joined: 20-September 08 From: Neenah, WI Member No.: 6,539 Mood: Thankful |
Good job.
--------------------  "This may be true but it is a chrysler sebring which is synonomous with being a p.o.s. car. Personally I gotta say it's getting really tiring having to clean off the sopping wet panties from my Hyundai Elantra every morning. Bitches love Hyundais." "Sometimes you wonder how the sperm that made that idiot was the fastest swimmer. . . Must've had a "race motor" in it with nass under the hood. . . " - Alex2013gt |
|
|
|

|
Nov 7 2012, 01:09 AM
|
|
 Poster Pro Group: Lifetimer Posts: 961 Posts Per Day: 0.21 Thanks Received: 180 Trader Stats: 2 (100%) Joined: 1-September 11 From: Philadelphia, PA Member No.: 11,051 Mood: Full |
Nice! I love all the pics. Pretty good description there.
--------------------  2008 Hyundai Elantra SE / Carbon Grey / Incus Body Kit / Sold at 98,400 miles 2011 Hyundai Genesis Coupe Premium / Black / Current DD at 43,000 miles |
|
|
|
|
Nov 7 2012, 07:54 AM
|
|
 J.Electron-Elantra 2013 GT Group: Lifetimer Posts: 594 Posts Per Day: 0.14 Thanks Received: 120 Trader Stats: 1 (100%) Joined: 24-September 12 From: Delaware Member No.: 13,648 Mood: Happy |
Great Job! Thanks for the photos and discriptions.
-------------------- A proud member of the Elantra club.
2013 Elantra GT 6-Sp M/T w/Style 2008 Nissan Versa SL |
|
|
|
|
Nov 7 2012, 08:49 AM
|
|
 CarPuter Masta! Group: Lifetimer Posts: 6,363 Posts Per Day: 1.03 Thanks Received: 130 Trader Stats: 11 (100%) Joined: 23-June 07 From: Toronto, Canada Member No.: 4,300 Mood: Relaxed |
That looks like a nice and easy install. Great write-up!
So the aux in the back is only on when the car is on, right? Don't want you draining your new battery now.. --------------------    carPC Build Thread | My Elantra Site | My Fiero Site | My WebSite | Donate here to keep ElantraClub online and growing. |
|
|
|
|
Nov 7 2012, 11:36 AM
|
|
|
GT for life! Group: VIP Members Posts: 6,303 Posts Per Day: 0.89 Thanks Received: 478 Trader Stats: 2 (100%) Joined: 27-January 05 From: Greenville, SC Member No.: 34 Mood: Optimistic |
QUOTE (sarge @ Nov 7 2012, 08:49 AM)  That looks like a nice and easy install. Great write-up! So the aux in the back is only on when the car is on, right? Don't want you draining your new battery now.. Yes the aux is only on when the car is on. As far as the install, I would say it was one of the easier cars I've worked on. Its been a number of years since I've last done an install, but it is like riding a bike, you never forget. Heck the extra rubber grommit in the door with a straight line into the interior of the vehicle seemed like it was placed there on purpose for people doing a stereo install! I tried to snap pics along the way, but there were a few things I wish I took pictures of, but I'm not going to take the car back apart. That being said, if you have questions feel free to ask! 
-------------------- Please consider helping keep the club online and independent. Donate here to help the club.
Current Car: 2013 Hyundai Elantra GT, 6 spd manual w/ the style and tech packages Previous Hyundai's: 2011 Hyundai Sonata SE in Venetian Red; 2006 Hyundai Sonata GLS, 3.3L V-6 in Ebony Black; 2004 Elantra GT, 5 spd manual in tidal wave blue |
|
|
|
1 members thank Alex2013GT for this post Red Elantra GT | |
|
Nov 7 2012, 01:15 PM
|
|
 Poster Pro Group: VIP Members Posts: 874 Posts Per Day: 0.20 Thanks Received: 169 Trader Stats: 0 (0%) Joined: 21-May 12 From: Pennsylvania Member No.: 12,773 Mood: Chipper |
Looks like it was a smooth install!
--------------------  |
|
|
|


|
Nov 8 2012, 10:23 PM
|
|
|
Club Regular Group: Lifetimer Posts: 131 Posts Per Day: 0.03 Thanks Received: 23 Trader Stats: 0 (0%) Joined: 5-August 12 From: Ottawa, ON, Canada Member No.: 13,293 Mood: Wise |
Nice write up Alex, thanks for this, maybe someday I'll want a little more oomph out of the stereo and will come back to this thread.
-------------------- 2013 Elantra GT - Monaco White SE Tech pkg.
 |
|
|
|
|
Nov 13 2012, 12:31 AM
|
|
|
GT for life! Group: VIP Members Posts: 6,303 Posts Per Day: 0.89 Thanks Received: 478 Trader Stats: 2 (100%) Joined: 27-January 05 From: Greenville, SC Member No.: 34 Mood: Optimistic |
Two slight updates to the install. First the connection to the battery. If you look closely at the pic I posted above, I originally had the power cable attached to the bolt that allowed you to remove the positive terminal from the battery. By doing this, you can't get that bolt tight enough (at least I couldn't) and so it was a little loose. I moved that and attached it to one of the other bolts on the battery. (there are a couple by the positive terminal)
The second thing is that I moved the ground wire for the amp. Where I first put it didn't ground it very well (the amp actually stopped working after about a week) so I moved it to a different screw. I also scraped the paint off the metal to allow for a better ground. Here is a pic of where I now have it grounded. You can also see where I tapped the remote turn on wire for the amp at (which I had forgotten to take a pic of during the original install). One additional observation. The sub box is a perfect size and allows me access to both the left side of the underfloor storage as well as the right which is where I put the amp at. It is easy enough to remove quickly if I wanted to, but I like the fact that I can get to both compartments without as much as needing to slide the box left or right 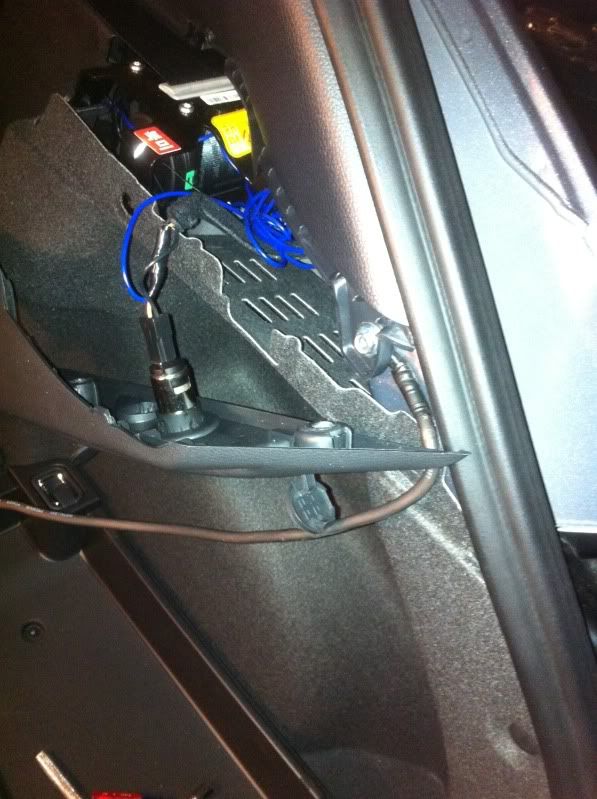
-------------------- Please consider helping keep the club online and independent. Donate here to help the club.
Current Car: 2013 Hyundai Elantra GT, 6 spd manual w/ the style and tech packages Previous Hyundai's: 2011 Hyundai Sonata SE in Venetian Red; 2006 Hyundai Sonata GLS, 3.3L V-6 in Ebony Black; 2004 Elantra GT, 5 spd manual in tidal wave blue |
|
|
|
|
Feb 27 2013, 12:19 AM
|
|
 Club Newbie Group: Members Posts: 22 Posts Per Day: 0.01 Thanks Received: 7 Trader Stats: 0 (0%) Joined: 23-February 13 From: Northern Utah Member No.: 14,648 Mood: Irritated |
Thanks again for this sweet write-up Alex!
I'm wondering though... Mightn't one tap the rear speakers for the line out? I'm not too sure where they are. If they're in the rear doors, I guess that wouldn't work too great. I'm just worried about screwing the molding up when I take it off... I've done several stereos, but never on a car this nice lol. Hate to sound lame, but this is, without a doubt, the nicest car I've ever owned... Oh. And this instal won't void any warranty, will it? I may have asked somewhere else, but I'm not sure. Teaching history to 100 alt-Ed students for 11 hours a day has addled my already addled brain... Ha! This post has been edited by CitizenPie: Feb 27 2013, 12:21 AM -------------------- It is what it is...
|
|
|
|
|
Feb 27 2013, 12:51 AM
|
|
 Outta the way! Group: Leader Posts: 5,972 Posts Per Day: 0.85 Thanks Received: 272 Trader Stats: 4 (100%) Joined: 27-January 05 From: Citrus Heights, CA Member No.: 33 Mood: Cocky |
Tapping into the rear speakers for the line-in to the "High Level" input is perfectly fine. I did it on my old Saturn and never had an issue.
Regarding your warranty, they can only void your warranty if it can be shown that your modification directly caused the failure. If you tap in to some power source behind the dash and fry your instrument cluster, it's on you. If you run your power and ground properly, you have nothing to worry about. -Roy -------------------- "If what Jesus said was good, what can it matter if he was God or not?" - Kurt Vonnegut
 |
|
|
|
1 members thank roydjt for this post Red Elantra GT | |

|
Feb 27 2013, 10:30 AM
|
|
|
GT for life! Group: VIP Members Posts: 6,303 Posts Per Day: 0.89 Thanks Received: 478 Trader Stats: 2 (100%) Joined: 27-January 05 From: Greenville, SC Member No.: 34 Mood: Optimistic |
I decided to tap in behind the dash as I knew where the wires were to tap into. If there were speakers in the rear deck, I would've definitely tapped into them there, but figured I would rather take apart the dash than the doors. The dash was actually not too bad to take apart. The long silver trim is possibly the hardest part, but just take a real slim flathead screw driver and start at the end by the seats. Pull it up enough to get your fingers underneath the trim to grasp and then firmly but slowly pull up. There are clips that will release under the pressure, but it does take a decent amount of pressure to get them off. Once you get one started you realize how much it takes and you are less nervous doing the rest of the trim as well as the other side. After you get that off, there are a couple screws and that's it.
Also, I'll respond to the message I saw on your other post. $200 for an install on this car is insane. I had no idea how I was going to do the install (i.e. had no write up to follow) and it's been a number of years since I've installed a stereo. I was scrambling to find wire diagrams, etc and it didn't take me too long. With the write up I did to help others out, it should be fairly simple if you are familiar with wiring stereos. I also decided to run the power line through the door instead of through the firewall. There was an empty rubber grommet in the door that I just ran the wire through. It was literally perfect! It was getting dark at that point so it saved me trying to figure out how I was going to get through the firewall. -------------------- Please consider helping keep the club online and independent. Donate here to help the club.
Current Car: 2013 Hyundai Elantra GT, 6 spd manual w/ the style and tech packages Previous Hyundai's: 2011 Hyundai Sonata SE in Venetian Red; 2006 Hyundai Sonata GLS, 3.3L V-6 in Ebony Black; 2004 Elantra GT, 5 spd manual in tidal wave blue |
|
|
|
1 members thank Alex2013GT for this post CitizenPie | |
|
2 user(s) are reading this topic (2 guests and 0 anonymous Users)
0 Members:


![]() Similar Topics
Similar Topics
| Topic | Replies | Topic Starter | Views | Last Action | |
|---|---|---|---|---|---|
 |
2013 GLS Engine Air Filter Are there two engine air filters? |
2 | stevesusko | 1,470 | 30th June 2017 - 07:32 PM Last post by: stevesusko |
|
2013+ GT grill | 0 | AKENT | 879 | 10th October 2016 - 02:27 PM Last post by: AKENT |
|
2013 GLS oil filter Is Amazon filter really an OEM? |
2 | stevesusko | 1,106 | 5th July 2016 - 07:54 AM Last post by: stevesusko |
|
2013 GT Rear Wiper | 5 | LarryNH | 16,985 | 10th May 2016 - 02:34 PM Last post by: THEdexaTRON |
|
Installed OBX pulleys | 3 | 2000J25SP | 1,467 | 3rd April 2016 - 06:04 PM Last post by: 2000J25SP |
Copyright 2022 The Elantra Club  |
Time is now: 11th May 2024 - 10:01 AM |
Elantra Club is not affiliated in any way with Hyundai Motor America |